This project began as a quick hack to make use of the cool Pimoroni Inky Pack. I was quickly nerd-sniped into exploring the depths of micropython and power optimization on the Pico.
As frequent readers know, I’m an eInk enthusiast, so I recently grabbed a Pimoroni Inky Pack to use on another project. Unfortunately, I found the refresh experience just a bit too janky for interactive purposes. However, I couldn’t let such a nifty piece of hardware go to waste. That’s when I thought of using it to build something useful that didn’t need a fully interactive UX: a weather station.
Why APRS?
At first, I tried to use the popular and super simple weather API wttr.in. Unfortunately it only seems to cover large cities and I wanted to use it further afield. This led me to discover a fascinating alternative: ham radio! Well.. APRS on ham radio bands to be more precise. APRS operates on a specific frequency (typically 144.39 MHz in North America) and allows amateur radio operators to send and receive data packets, which can be relayed through a network of stations, including digipeaters (digital repeaters) and internet gateways. This system makes it possible to track the position of vehicles, monitor weather stations, and communicate with other hams over large distances, even globally, when combined with internet-connected APRS gateways.
To transmit APRS data, you typically need a ham radio license, since it uses frequencies reserved for licensed operators. However, thanks to internet gateways, the data transmitted is accessible to everyone online. Even better, https://aprs.fi/ offers a nice API that makes accessing these data straightforward.
There are tons of stations transmitting live weather data (“WX” reports) via APRS all over the world and you can find the nearest one to you on https://aprs.fi/
This project – picowx – is a device which connects to the internet via wifi and uses the aprs.fi API to pull in local weather reports, including from stations that popular weather APIs might miss. What makes this project particularly cool is that it’s tuned for low power consumption, making it perfect for long-term battery operation. The eInk display is ideal because it consumes power only when being updated, allowing the weather station to run for a long time on a single charge when the display is mostly static.
All the code is available at https://github.com/dps/picowx.
Hardware
To build this project, you’ll need:
- Raspberry Pi Pico-W
- Pimoroni Inky Pack
- Pimoroni LiPo Shim and battery (optional)
- 0.1" headers for the Pico-W (you’ll need to solder these on, or buy a Pico-WH with pre-soldered headers)
I’ve compiled a DigiKey parts list (minus the battery) for your convenience.
Software
Most of the logic behind picowx is implemented in MicroPython, but achieving low power consumption required some custom C code. I built a special version of the Pimoroni flavor of MicroPython to add this functionality. You can find a flashable .uf2 file in my GitHub repo, along with the necessary modifications to MicroPython. If you’re inclined to tinker, you can explore these changes directly at my MicroPython fork.
For those who want to dive deeper, my pimoroni-pico fork includes support for the Inky Pack and features a GitHub Action/Continuous Build that produces the .uf2 file, should you wish to recreate it yourself.
There’s an installation and user guide in the Github README. Check it out if you’d like to set one up for yourself.
For the rest of this post, here are a couple of things I found particularly interesting:
Captive portal to configure wifi credentials etc
Most Raspberry Pi Pico-W projects require you to manually place your WiFi SSID and password in a Python file on the device’s filesystem. I wanted to build an experience that was a bit more like a consumer device and doesn’t assume that the user knows how to set up a micropython development environment. I scratched my head for a few minutes and then remembered setting up a nice air quality sensor recently by connecting, initially, to a special wifi network and captive portal it put out to get initial configuration data. I wondered, could the Pico-W handle something this sophisticated? A bit of Googling led me to Simon Prickett’s great Wi-Fi setup with Raspberry Pi Pico W post. I used Simon’s general idea and some of his code to implement a similar setup experience for picowx.
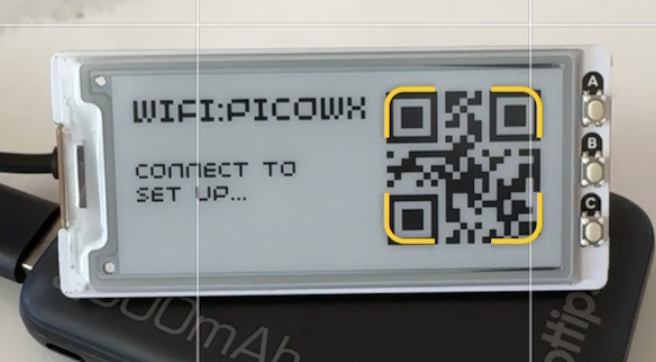
I’m quite pleased with how this turned out – I added a wifi access QR code which gets you connected more quickly on a mobile phone. The captive portal UI also worked out great to set up the APRS station callsign to track, etc.
Deep sleep
One of the biggest challenges in this project was reducing the power consumption to around 1.4mA when the device is asleep. This was achieved using the sleep_goto_dormant_until_pin feature from pico-extras, which significantly extends the battery life. ghubcoder’s post on deep sleeping the Pico in MicroPython was a great inspiration. The process was a little more involved in my case as I needed to build a version of micropython which also supported all the pimoroni addons and that repo currently uses a fairly old build of micropython which is not compatible with the latest pico-sdk. Much git log spelunking ensued to make sure all the versions lined up. I was particularly impressed with Github actions in this process – all the firmware builds I ultimately used were built by the “Micropython” action on my pimoroni-pico fork - the way you can now fork repos and essentially have their continous builds come along for the ride too is excellent!
Ultimately, I was able to wire this new C code through to micropython so the pico can go into its lowest power mode (dormant), stopping all timers except the ring oscillator and wake up on an interrupt driven by a hardware pin (in our case, a press of button A on the Inky Pack).
STATIC mp_obj_t picosleep_pin(mp_obj_t pin_obj, mp_obj_t edge_obj, mp_obj_t high_obj) {
    mp_int_t pin = mp_obj_get_int(pin_obj);
    bool edge = mp_obj_get_int(edge_obj) == 1;
    bool high = mp_obj_get_int(high_obj) == 1;

    uint scb_orig = scb_hw->scr;
    uint clock0_orig = clocks_hw->sleep_en0;
    uint clock1_orig = clocks_hw->sleep_en1;

    sleep_run_from_rosc();

    sleep_goto_dormant_until_pin(pin, edge, high);
    recover_from_sleep(scb_orig, clock0_orig, clock1_orig);

    return mp_const_none;
}
invoked in micropython via:
button_a = machine.Pin(12, machine.Pin.IN, machine.Pin.PULL_UP)
picosleep.pin(12, 1, 0)
Getting the C code in place to be called from micropython was pretty complicated, but then actually getting the pico to go fully to sleep was even more of a journey. Everything seemed to work fine initially, but I wanted to verify that I was actually achieving the advertised 1.4mA draw. I rigged up a very lowfi current monitoring rig with a cheap multimeter in series with the device by hacking a USB power cable.
evential triumph - 1.2mA in dormant sleep
The maximum current draw while the device is connecting to wifi and updating the display is about 80mA, and when sleeping with the CPU and clocks powered up, it’s around 30mA. The first time I measured my current draw under the fancy new picosleep it was… 30mA - hmmm… Much tinkering ensued. Ultimately, I found it was necessary to do two things: first, I removed all print() statements from my code which were sending data out over the UART. While the related clocks are all stopped by the code above, several others have reported this being necessary on the various forums. Second, the wifi chip needs to be explicitly powered off before sleeping. This can be achieved in micropython code quite simply.
The inner loop of micropython code then becomes:
# Update once and then on every button press
while True:
    aprs_update(config['ssid'], config['password'], config['callsign'], config['api'], nickname, tz_offset)
    time.sleep(1)
    wlan = network.WLAN()
    wlan.active(False)
    wlan.deinit()
    button_a = machine.Pin(12, machine.Pin.IN, machine.Pin.PULL_UP)
    picosleep.pin(12, 1, 0)
    wlan.active(True)
Future Enhancements
Looking ahead, I’d love to design a sleek enclosure for picowx to make it more portable and durable. I’m also considering adding functionality to track multiple stations, giving users the ability to monitor weather reports from several locations.
Standing on the Shoulders of Giants
This project wouldn’t have been possible without the inspiration and groundwork laid by others in the community. I’m particularly grateful to ghubcoder and Simon Prickett for their insightful write-ups and open-source contributions.
For further reading and inspiration, check out:
- Simon Prickett’s Wi-Fi setup with Raspberry Pi Pico W
- ghubcoder’s post on deep sleeping the Pico in MicroPython
I also want to extend my thanks to the maintainers of aprs.fi for providing such a robust and intuitive API, which makes projects like this possible.
Notes
If you’re trying to get dormant sleep working on a pico-w and you’re able to use the very latest pico-sdk (I couldn’t as pimoroni-pico needed an earlier build) you may find that the built in support works and the picosleep hack is not required. That pull request added support via machine.lightsleep and says 1.55mA was measured. Do measure yourself too - I found plenty of things can get in the way!
Also, once all the above was complete, I discovered https://github.com/tomjorquera/pico-micropython-lowpower-workaround/blob/master/lowpower.py which reproduces the pico-extras C code logic in micropython directly and might work out to be an easier path for you?